


Recently, we stumbled across a big blog problem. We discovered that the newest Apple Retina Display was making all of our images look blurry to anyone viewing our work on one, and we had NO idea!
Let’s back up. For the past year, Amy’s 2011 Macbook Pro has been acting up. Freezing. Running slow. The rainbow wheel of death all. the. time. We’d been wanting to replace it for months and months, but with our schedule so far this year, as crazy as it sounds, we just couldn’t find the time to trade it out… until this summer. We had a window of opportunity a few weeks ago where all of our most recent jobs were edited and out the door, and we didn’t have another one for a week. In Photography Land, we call this “The Greatest Thing Ever.” Are we right? Or are we right?!
So, we made a Time Machine backup of Amy’s old MacBook Pro, went to the Apple Store and bought a brand new Apple MacBook Pro Retina Display. For those who are technical, it’s got 16GB of RAM and a 512GB flash hard drive. For those who aren’t, it’s a pretty powerful machine, the fastest laptop Apple makes, and Amy was over the moon, because in her editing world, it’s like having a sports car engine that starts with the press of a button, growls, roars, and then drives 100 MPH like it’s gliding, versus the go-kart she had that started reluctantly after several pulls of the cord, putt-putted along, and crapped out without warning.
Needless to say, she’s getting A LOT done A LOT faster now. Our only regret is that we didn’t get it sooner!
Lots of people are curious why we do all of our editing on a laptop instead of a big desktop monitor, and our answer is that we are on the road so much that it’s the only way we can keep up! We actually wrote a whole separate post about how we edit on the road, which you can read here.
Problem #1: Blurry Images
There was, however, one problem we discovered just minutes after opening the box from Apple and turning on our new sports car: blurry Apple Retina Display Images. Every image that we’d ever posted on our blog looked blurry and, well, just bad. We don’t know how else to say it. Our website looked fine. Social media was pretty good. But our blog images looked like we didn’t know how to focus a camera.
At all. After a momentary panic attack — and threats to return the computer! — we collected ourselves and started problem solving. We started by setting Amy’s new computer and her old computer side-by-side, opening our blog to the same post, adjusting the brightness on both screens so everything was the same, getting down at eye level, and going back-and-forth between each photo. Left. Right. Left. Right. Left Right. Friends, we looked cray. Straight up. Like two cats following a string. But, after doing that do a few minutes, blinking a lot, closing our eyes, counting to three, and opening them, we came to the same conclusion: the photos on Amy’s Retina Display looked like a lower quality than the exact same ones on Jordan’s non-Retina Display. They looked soft, blurry, and pixilated.
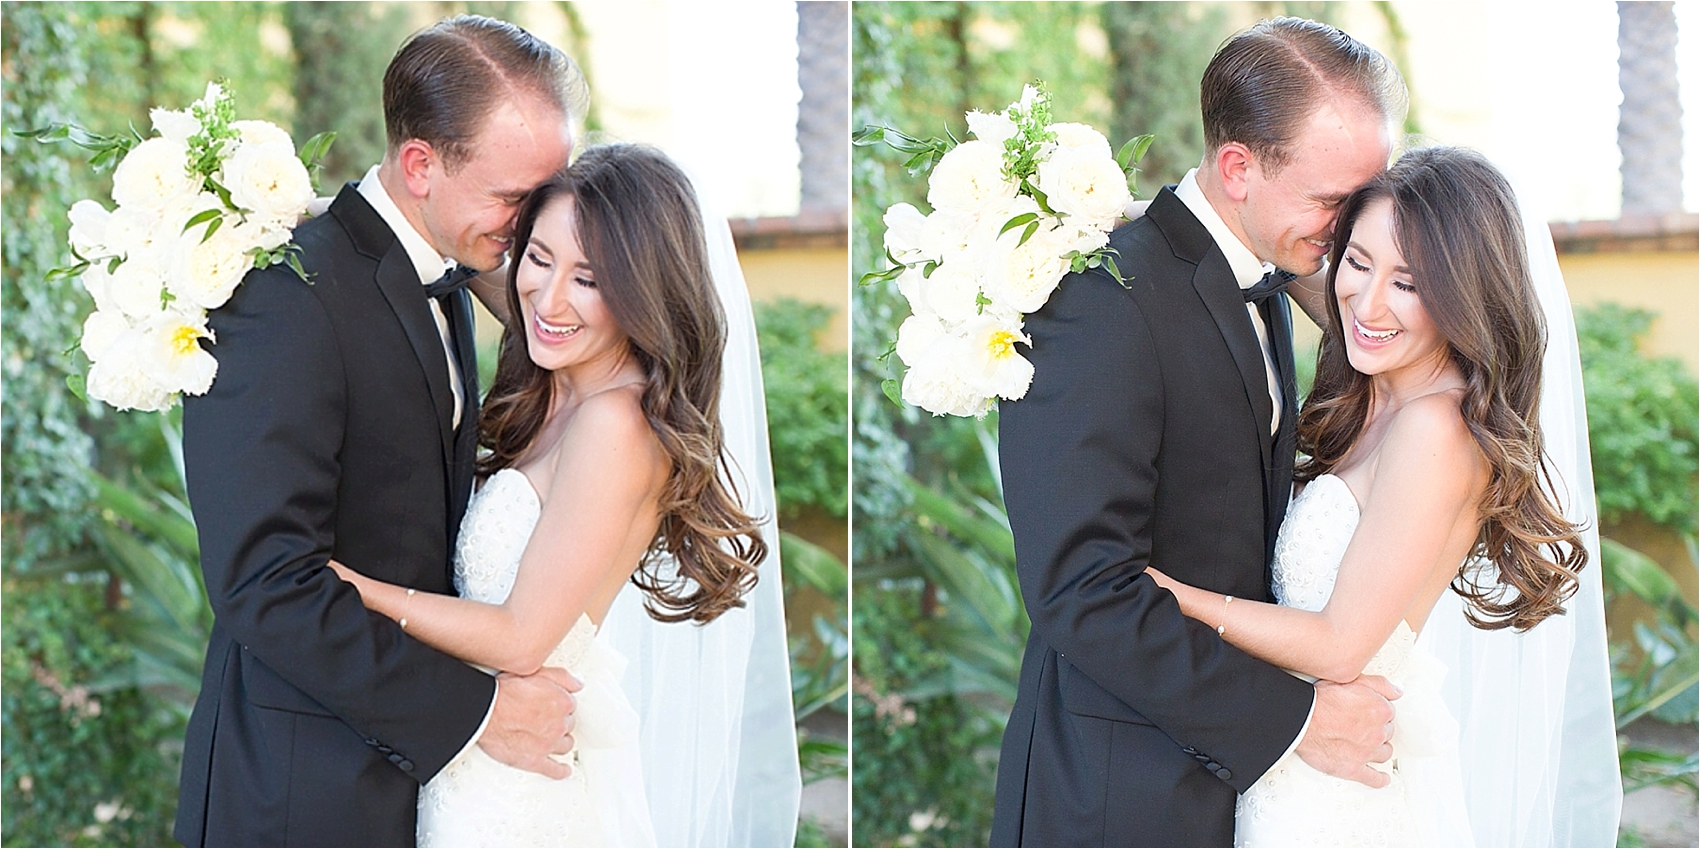
Here’s an example of what was happening. Pay special attention to Jena’s eyelashes and hair. ZOOM IN if you don’t see it right away!! The photo on the left is what we were seeing on the new retina display, and the photo on the right was what someone on a regular screen would see. Can you see the difference? Ah! Zoom! Look at all the lost detail. The longer you stare at the retina version, the more it makes you feel like the whole world is blurry and pixel-y.
Whaaaat?! This thing was supposed to make images look better, not worse, right?We had another momentary panic attack and then we reached out to a friend who’s an amazing blog and website designer, because we figured she has to know what’s UP with this, right?! Yep. She sure did. Here’s what we learned…
Problem #2: Every Blog Image Was Blurry
In the past, we’ve always used BlogStomp to prep our blog and Facebook images. You can read a post we wrote about how we do that here. As long as we can remember, we’ve been “stomping” our blog images at 850 pixels wide, which is the width our blog format requires. What we learned — and, again, we’re not technical experts, but from what we understand — is that Apple Retina Displays have WAY more pixels than most other displays out there, including Apple’s old pre-Retina screens. On one hand, that’s great! It means that Amy’s screen is a higher quality. On the other hand, it’s bad, because a) since our images weren’t sized for Retina Displays, b) our photos look bad on Retina Displays, and c) a lot of our brides and photographers have Retina Displays, so it’s not a great representation of our work! Yikes!
If that didn’t quite make sense, we’ve been using another analogy in our house recently: our old blog images are like VHS tapes and Amy just upgraded to a DVD player. So, anyone else who’s out there without a Retina Display, you won’t notice a difference in our images at all. Everyone with a Retina Display, if you scroll back a few weeks, you will. Why? Because as soon as we realized the problem, we moved quickly to fix it! Within reason, of course. What do we mean by that? Well, for as much as we’d love to, we can’t go back a re-stomp every image on our blog that’s we’ve ever posted, re-upload them to WordPress, delete the old images in each post, and re-post them. That would take WAY too long. So, we’re just doing this instead going forward…
The Simple Solution
We doubled the width of our blog images in BlogStomp so that it’d be packed with double the pixels. That’s it! We went from 850 pixels wide to 1700. And it worked! When we put our computers side-by-side now, they look good on Amy’s computer and Jordan’s, too. But what should YOU do? Whether you have a Retina Display or not, we’d recommend doubling the width of your current blog images, because even if you don’t have a Retina Display right now, for A LOT of millennial brides and photographers who adore Apple (like we do!), they’re going to (most likely) be viewing YOUR images on a Retina Display in the next few years, if they haven’t already! And we’d HATE for your work not to best represent you when they do!
If you’re like us and didn’t know about this before, we’re glad you know now! If you’re overwhelmed (at first) like we were, you’re not alone! Just make it your goal from today forward to stomp your images wider knowing that it’s the future, and don’t worry about the past. You can’t control that anymore! Is this starting to sound like a Frozen song?! Perfect.

We’re so proud of our shooting and editing course students all across the world! They’re shooting better, editing faster and serving their clients better than ever before!
Looking for more resources?


")